Making Earth Science more efficient (and fun!) with Python
Introduction
Much of the time spent doing research studying the atmosphere, earth and ocean is consumed downloading data files, running simulations, loading the results into programs for analysis such as MATLAB or Ferret, performing calculations and visualizing the results.
This cascade of computation often involves a human spending hours sitting at a computer waiting for each step to finish in order to begin the next step. The process becomes very tedious very quickly.
But there's an easier way to accomplish all of this: use Python.
Python is a scripting language that enables its users to "glue" applications together and process data with simple and reusable code. Python's syntax makes it simpler to learn and use than other languages commonly used in science research, such as Fortran and C, but it can easily interact with and run programs written in other languages, which is especially useful for running legacy code.
I have two audiences in mind while writing this tutorial: seasoned scientists looking for a way to increase the efficiency of their research and students who are just beginning their careers and have little familiarity with what computational research entails.
When we're finished with this tutorial, you will have the skills to be able to access an FTP site, determine what kind of data is available, download the proper data sets, open MATLAB to analyze the data, output the results in a graph and send a message to the user's email address or a text message to the user's cell phone if the script crashes. This last feature is particularly useful because it minimizes CPU downtime while maximizing the user's ability to concentrate on other tasks while the scripts are running.
The basics
This tutorial works with the Linux operating system. If you're not a Linux user, take a look at Appendix A: Using the Linux operating system.
Hello, world!
Whether you're an experienced programmer or an absolute beginner, the hallmark exercise of learning a new language is writing a simple script that prints out the greeting "Hello, world!"
To begin, we'll open up the terminal, which is a program that allows us to send commands to the Linux shell. The shell is the interface between you and the Linux kernel which controls the CPU. To start up the shell, open up the main menu and find the terminal. It will be in a different location depending on your flavor of Linux. I'm running KDE 3.5 and the path is Menu -> Utilities -> Terminal.
You should see an empty screen with some character or text in the upper left corner followed by a blinking cursor. Depending on what type of shell your version of Linux is running the text will be something like $ or ~> or servername~>. It doesn't matter. I'm using a shell called the Korn shell, my display is shown below.
Type the four commands shown below, pressing the "Enter" key after each command to execute it.
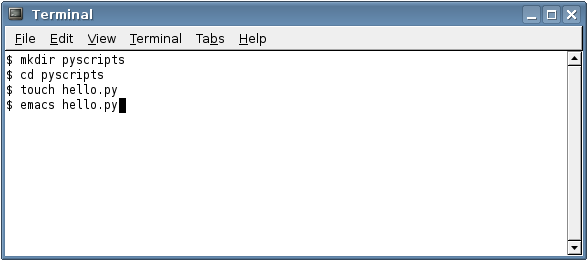
The first command is mkdir, which stands for "make directory." If you're used to graphical operating systems such as Windows or Mac OS, a directory is simply another term for a folder. Here we create a directory named pyscripts to store our Python scripts.
The second command is cd, which stands for "change directory." We change to the pyscripts directory we just created -- this is like double clicking a folder to open it.
The third command is touch, which is a Linux program that either creates a file with the specified file name or updates the timestamp of an existing file. We create a file named "hello.py."
The last command is emacs, which starts up a text processing program. When you enter this command, Emacs should open up in a new window. There are many Linux programs for text processing. We're using Emacs here because it is the most popular. If you are familiar with another program, such as vi, feel free to use it instead.
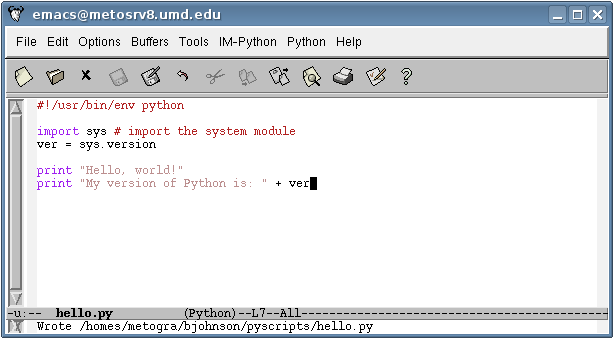
The Emacs window has three sections. The large white section where you type code into is called the buffer window. Text in the buffer isn't written to a file, it is floating in your computer's RAM until you actually save the file.
Below the buffer window is the mode line. Right now our mode line is telling us that we have opened up "hello.py".
The final section is the echo area. Emacs echos, or prints, the results of commands there for us to read.
Type the following code into your buffer window.
After you are finished, save the file by clicking File -> Save, or by typing Ctrl-x Ctrl-s.
If you saved the file correctly, Emacs will print something like "Wrote /somepath/pyscripts/hello.py" in the echo area.
Let's go through this script line by line:
- The first line, #!/usr/bin/env python tells the shell that we are now programming in Python.
- The second line imports a code module that has already been written and stored elsewhere on the computer. The sys module allows us to interact with the system and access certain system variables. Everything written after the "#" sign is a comment, and is not executed by the computer.
- In the third line, we create a variable, named "ver" and assign it a value with the equals sign. Here we set version equal to some text from the system module, telling us what version of Python we are using.
- The fourth and fifth lines will print text to the terminal when the script is executed. The first printed line will say, "Hello, World!" The second line will say, "My version of Python is:" and then it will print the value of the ver variable we created earlier. The plus sign here joins the two phrases together.
Your text will likely remain black instead of changing to a mix of red, beige and magenta, as mine did above. To see if your version of Emacs is already equipped to recognize Python code, click Options -> Syntax Highlighting (Global Front Lock Mode). If the text changes color, you're good to go. If it does not, and you want Emacs to do syntax highlighting in your future scripts, visit Appendix B: Enabling Emacs to recognize Python.
Now close Emacs by clicking File -> Exit Emacs, or by typing Ctrl-x Ctrl-c.
Go back to the Terminal window, and type python hello.py like below. This command tells the shell to use Python to execute the script we just wrote.
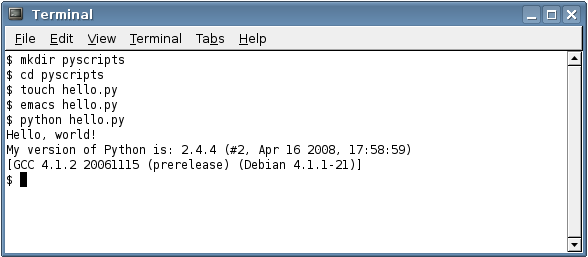
If your script was written correctly, the terminal will respond by outputting the results of the script. If you made a typo in the script, an error message will print. In a simple script such as this one, it will be easy to use the message to diagnose and fix your error.
Congratulations, you just wrote your first program in Python.
Python guides
Now it's time to play. Python is an extremely enjoyable language to learn and there are many free resources available on the web.
For beginners
If you're new to programming, visit Python's Beginners Guide, which is a list of different tutorials. How to Think Like a Computer Scientist is a good introduction from the list.
For programmers
If you're already well-versed in programming, Guido van Rossum, the creator of Python, wrote a comprehensive guide to the language.
The good stuff
Now that you've got a general familiarity with the language, we can get to some useful techniques for decreasing the amount of grunt work in scientific research.
Interacting with the shell
Shell scripting is a nearly indispensable skill when using Linux. Shell scripts enable users to automate many rudimentary tasks by saving a sequence of commands in a file, which is then fed to the shell to execute.
Python is capable of interacting with the shell and operating system in a manner that is both simpler to program and more sophisticated than shell scripting. Python comes with an os module that executes shell commands and interacts with the operating system upon which it is running.
One of Python's most useful aspects is its ability to manipulate strings. If you haven't come across the term "string" before in a computing context, a string is simply a set of text characters strung together. "What is your favorite color?" is a string. "4$d2lc{n%mx" is also a string.
Since filenames are strings and directories contain lists of strings, being able to manipulate them in an easy fashion can make scripts incredibly useful.
We'll go over a simple example and learn some functions and principles that can easily be applied to similar problems.
Below we use the ls command to provide a listing from one of the directories on my computer. The directory contains atmospheric climate data from the tropics. The data is from the models stored in the Intergovernmental Panel on Climate Change (IPCC) database.
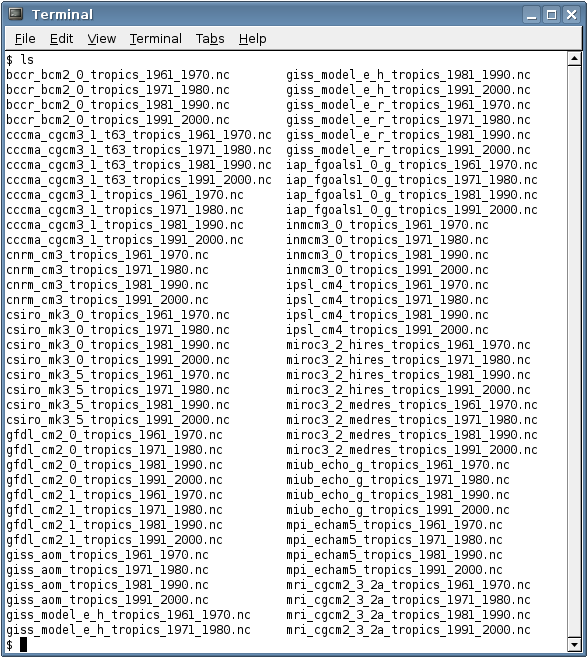
Yikes! Even though the file names have a certain structure, there is a lot of text there. We can use Python to look over patterns in the file names to extract just the parts we need.
Let's take a look at the first file, bccr_bcm2_0_tropics_1961_1970.nc. Scientific filenames can be cryptic if you're working with them for the first time. I've used this file before, so I've already looked up what each part means.
- bccr stands for Bjerknes Centre for Climate Research, which is an institute in Norway that produced the data.
- bcm2_0 is the climate model used to produce the data. This one is the Bergen Climate Model Version 2.
- tropics is the type of data stored in the file. This file contains data from the tropics.
- 1961_1970 is the range of years stored in the file. This one contains data from 1961-1970.
- .nc is the suffix denoting the file type. nc is short for Network Common Data Format (NetCDF), which is a file that stores both data and a self-description of what the data is. If you are unfamiliar with NetCDF files, please read Appendix C: Working with NetCDF files.
We want to feed the files in this directory to a function that can perform some calculations. I have a function that will take the model name and the years each file spans to compute a yearly average.
My function's usage syntax is: yearly_ave(model,variable,yrs_file1,years_file2,years_file3,years_file4).
The script below will parse our directory listing to make it usable by our program. We'll go through it line by line.
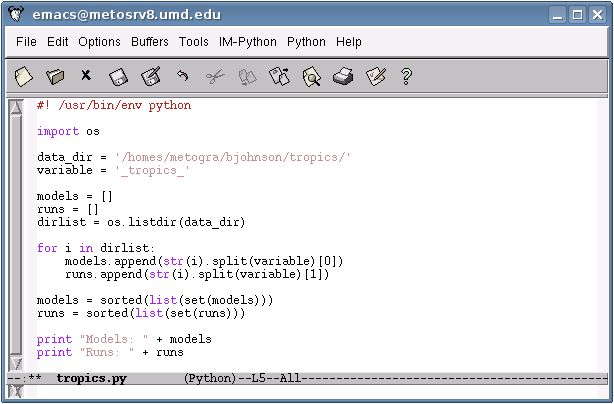
As in our hello.py script, the first line is a comment, declaring that we're using Python as our programming environment.
The second line imports Python's os module, which enables it to interact with the operating system.
In the third and fourth lines, we declare string variables; the first is the directory we'll be using and the second is the variable.
In the fifth, sixth and seventh lines we declare list variables. models and runs are empty lists. We'll put values in them later. dirlist is a list that contains the directory listing (the same as shown after executing the ls command in the previous image).
The eigth line starts a for loop. The loop iterates through all of the items in dirlist.
For each item in dirlist, lines nine and ten are executed. They look complicated, but are very simple if we use an example to break them down.
- Since i is the index variable of our for loop, well begin by examining it. In the first iteration of the loop, i denotes the first item in dirlist, bccr_bcm2_0_tropics_1961_1970.nc. The str function converts the filename to a string variable that Python can operate upon.
- Next, the .split function operates. It searches through the string for an instance of variable (in this case variable stands for '_tropics_', as in line 4), removes the text of the variable, and splits the string into the parts originally separated by the variable. So 'bccr_bcm2_0_tropics_1961_1970.nc' becomes a list with two items, ['bccr_bcm2_0', '1961_1970.nc'].
- Then the [0] indexes the item in the 'zeroth' place in our list. As you should have read in the tutorials, Python indexes lists starting at 0. So [0] corresponds to 'bccr_bcm2_0', while [1] corresponds to '1961_1970.nc'
- Finally, models.append adds our string to the models list. Before this line was executed, models was an empty list, now it is a list with one item, 'bccr_bcm2_0'. So we see this part of the script goes through the directory and finds the model name and adds it to a list.
Line ten does the same thing, except it adds the other item in the splitted list (in this case 1961_1970.nc) to the runs list.
Lines eleven and twelve eliminate duplicate entries in each list. The set function converts a list to a set, which is an immutable group of items, of which there are no duplicates. Sets are difficult to operate on, so the list function converts our set back to a list. The sorted function then puts the list items in alphabetical order.
Lines thirteen and fourteen print out the lists, so we can see them. If we execute the program, we can see its output.
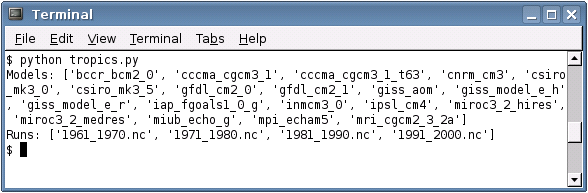
Now we can feed these to our function, which we'll do in the MATLAB section.
Running external programs
Python's os module allows for much more than directory listings. Here we'll merely use it to execute programs. It is an extensive module though, and its functions and their descriptions are listed in the Python documentation.
wget
wget is a treasured Linux utility that allows users to perform complicated downloads. Its source code and documentation are hosted at Gnu.org. We'll use a simple command to demonstrate how programs can be executed from Python.
It is tedious to manually download data from a huge database. The IPCC database, for example, has hundreds of directories and thousands upon thousands of files. Downloading just the files you would need for a simple research project using an FTP client would require hours of sitting at a computer waiting for files to download then changing directory and starting a new download. wget can download files recursively, which means it can download all of the directories and files stored within a given directory.
If we wanted to download all of the temperature data from the 20th Century runs of the IPCC database, we could use the simple terminal command wget -r --ftp-user=myusername --ftp-password=mypassword ftp://ftp-esg.ucllnl.org/20c3m/atm/da/ta/
Here's a breakdown of the command:
- wget starts the program running
- -r is an option telling it to do a recursive download
- --ftp-user= and --ftp-password= feed the ftp server your name and password
- ftp://ftp-esg.ucllnl.org/20c3m/atm/da/ta/ is the directory to download. This directory corresponds to 20th Century (20c3m) atmospheric (atm) daily (da) temperature (ta) data.
To execute this command from a Python script, we would use the following program.
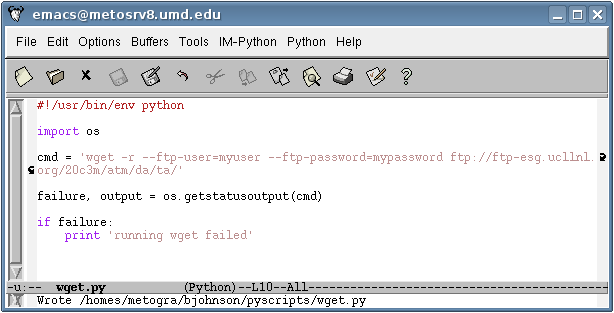
Here we import the os module again. We then save the command in the cmd variable and execute it with the os.getstatusoutput command. The command returns two variables, failure, which is a true or false variable, and the output variable, which is the textual output of the command. The if statement then uses the failure variable. If the command failed, it prints out an error message.
MATLAB
Python can also use the same os.getstatusoutput to run data processing programs such as MATLAB.
The syntax for executing a MATLAB script from the terminal is matlab -nodisplay -r "commands".
We can combine what we've learned in the previous two sections to do our first substantial set of automation. We update tropics.py to use the lists we created earlier to output commands executable by MATLAB.
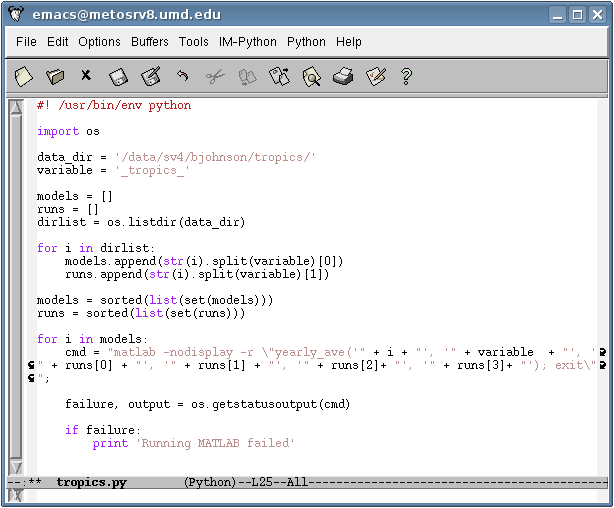
This code will iterate through the directory listing, printing out commands such as matlab -nodisplay -r "yearly_ave('mri_cgcm2_3_2a', '_tropics_', '1961_1970.nc', '1971_1980.nc', '1981_1990.nc', '1991_2000.nc'); exit" which can be then executed by MATLAB with the os.getstatusoutput(cmd) command.
Sending error alerts
Error alerts make Python scripts very condusive to automation with little downtime. Even if a script is automated, it is difficult to resist the urge to check on it once in a while to ensure things are humming along. Error alerts squelch this need by notifying you in the case of an error. Both of the techniques shown below should be written into functions and called after the if failure: statements instead of print 'error message' when running external programs.
Via email
Sending email via Python is simple with the SMTP module (SMTP stands for simple mail transfer protocol). Just create a script in the manner shown below and start sending away.
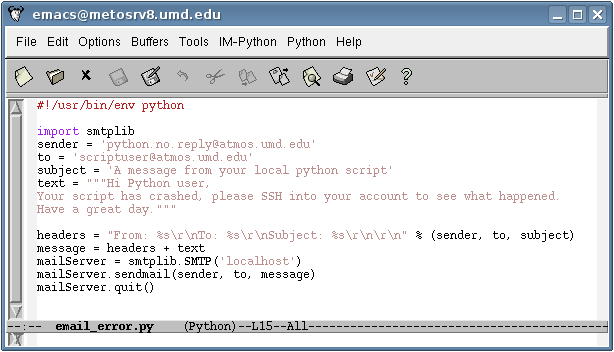
If you receive an error message reading:
Traceback (most recent call last):
File "email.py", line 11, in ?
mailServer = smtplib.SMTP('localhost')
File "/usr/lib/python2.4/smtplib.py", line 244, in __init__
(code, msg) = self.connect(host, port)
File "/usr/lib/python2.4/smtplib.py", line 310, in connect
raise socket.error, msg
socket.error: (111, 'Connection refused')
it means that your Linux system administrator disabled Python from being able to send email messages. This was the case for me when I attempted to run my script, so I emailed the system administrator and told him that I was trying to use python to send me an email alert when the script crashed. This is a very sensible thing to do with code, so my administrator enabled my scripts to send messages.
Also, make sure not to save your script as email.py, as that name will conflict with Python's already-existing module.
Via txt msg
Python can also send text message alerts to your cell phone. This enables you to keep tabs on your computation while away from the computer, or to have the freedom of keeping your email inbox closed, which may be a good idea, considering recent research.
The process is identical to sending an email alert, except the address is different and messages are limited to 160 characters.
If you include a subject it will appear in brackets ahead of the message. This cuts into the character total, so it is best to omit a subject header.
Let's say my cell phone number is (301) 555-1234, and my carrier is AT&T. If I wanted the script to send me a text message alert when it crashed, I would denote the recipient as: 3015551234@txt.att.net.
If your carrier is one besides AT&T, use the table below to find the correct suffix.
| Carrier | Suffix |
| Alltel | @message.alltel.com |
| AT&T/Cingular | @txt.att.net |
| Boost | @myboostmobile.com |
| Nextel | @messaging.nextel.com |
| Sprint PCS | @messaging.sprintpcs.com |
| T-Mobile | @tmomail.net |
| Verizon | @vtext.com |
| Virgin Mobile | @vmobl.com |
If you're trying to send an alert to a cell phone, but you're unsure of what service the phone is subscribed to, simply use the suffix @teleflip.com. Be frugal though, you can only send 100 messages per month using teleflip without paying a fee.
Data Analysis
Python can be used as an alternative (and unified) platform for using many different data formats.
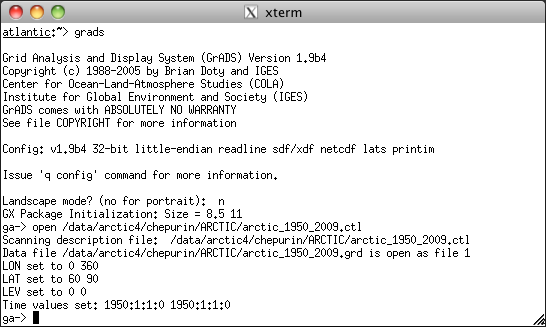
GrADS
GrADS, the Grid Analysis and Display System is widely used in Earth Science. It is a strange system to pick up for beginners, because it has both a scripting language and a command line language, and the syntax of the langages is not the same. Thus, I find it easier to use Python instead.
GrADS stores data in two files, a control file and a binary file.
- Control file (suffix: .ctl): Describes the content and name of the data file. It contains:
- binary filename
- a declaration of what missing values are designated
- a map between the data grid and world coordinates
- names and descriptions of the variables
- Binary file (suffix: .dat): Contains the actual data
Further Reading
If you're interested in learning more about Python and it's applications in numerical computing and visualization, take a look at Python Scripting for Computational Science by Hans Petter Langtangen. The book is an excellent general guide to Python's computational applications. It covers other topics including:
- Numerical computing
- Graphical User Interface Programming
- Web Interfacing
- Linear algebra
and more.
Appendices
The appendix items can be read in any order and are comprehensible independently of the rest of the tutorial. They are necessary to explain the proper installation and functioning of software components commonly used in Python programming and computational research.
Appendix A: Using the Linux operating system
This tutorial is written for users of the Linux operating system. Linux is the standard operating system in government research labs and academic settings and is the focus of this tutorial because it includes many, many utilities for automating work that are not found elsewhere.
If you are not using the Linux operating system, but would like to, installation is both free and simple. Please read these instructions from Linux.org.
People are often intimidated by Linux -- it has a reputation of being written by experts for experts. But Linux, in essense, is very simple: it is merely a collection of programs and folders with some commands for getting them to interact.
Basic commands
Here are some basic commands you may have to use during the course of this tutorial.
| Command | Description | Example Usage |
| dir (or ls) | Print a listing of the current directory | $ ls |
| cd | Change directory to a different one | $ cd pyscripts |
| mkdir | Make a new directory | $ mkdir pyscripts |
| rmdir | Remove a directory | $ rmdir pyscripts |
| pwd | Prints the directory you are currently working in | $ pwd |
| touch | Create an empty file or update the timestamp of an existing one | $ touch hello.py |
| rm | Remove a file | $ rm hello.py |
| cp | Copy a file | $ cp source destination |
| mv | Move (or rename) a file | $ mv source destination |
| less | Scroll through the text of a file; press 'q' when you're done scrolling | $ less hello.py |
Time to explore
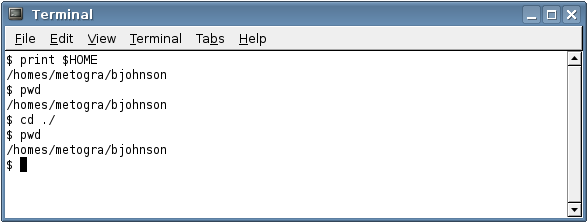
Exploring the directories on your system may be a tricky process when you're first beginning Linux. When you login to Linux, you'll start off in your home directory. To find the name of this directory open a terminal window and type the command print $HOME.
$HOME is a system variable, one stored by the Linux operating system. Use the pwd command from the table above to print your working directory. Since you're still in your home directory, the printed output of pwd should be the same as print $HOME.
When you want to reference your current directory in a command, type "./". For example, typing cd ./ would change to your current directory, doing absolutely nothing. Try it out and type pwd to make sure.
"../" denotes a parent directory. In my terminal below, my home directory is /homes/metogra/bjohnson. If I type cd ../, I would change directory to /homes/metogra.
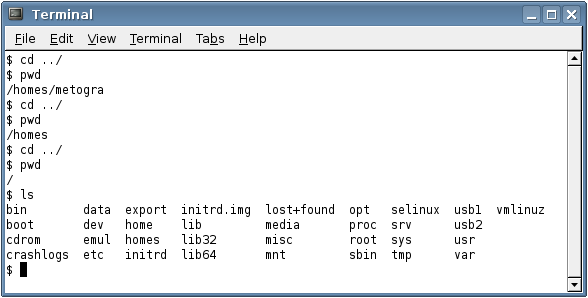
Repeating this process a few more times takes us to the "/" or "root" directory. It contains other directories that store files and programs that make Linux run.
Feel free to use the cd and ls commands to look around these directories. Linux has a very transparent setup.
Appendix B: Enabling Emacs to recognize Python
In order for Emacs to recognize Python script, you must have the python-mode.el library. Visit the download site on Sourceforge and download it.
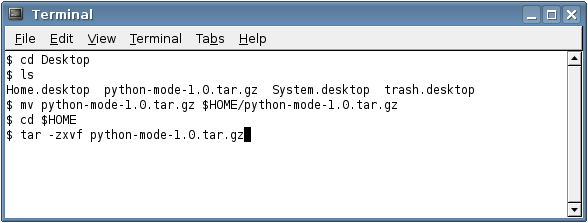
My browser downloads files to the Desktop by default. So to install it, we'll cd Desktop then ls to see if it's there.

To unzip the file, we'll move the file to our home directory using mv python-mode-1.0.tar.gz $HOME/python-mode-1.0.tar.gz.
It is likely that python-mode has been updated since I've written this tutorial. If this is the case, make sure to replace the "1.0" in the filename with whatever the current version number is.
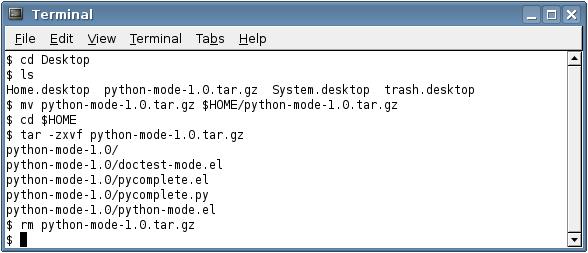
We'll then cd $HOME and use the command tar -zxvf python-mode-1.0.tar.gz to unzip the file.
This command has two parts:
- The first part, tar executes a program to unzip the file.
- The second part, -zxvf is a set of options for the tar program:
- z instructs tar to unzip the files first
- x says to extract the files next
- v tells the program to have verbose output, listing every action it takes
- f means to use the following file (in this case, python-mode-1.0.tar.gz).
Since we don't need the archive file anymore we can delete it with rm python-mode-1.0.tar.gz.
Now that we have the library loaded, we need to tell Emacs where to look for it. Open emacs and type Ctrl-x Ctrl-f ~/.emacs, then hit the Enter key.
This will create a configuration file named .emacs in your home directory or open your already existing one. Type the following commands into the file buffer:
(autoload 'python-mode "python-mode" "Python Mode." t)
(add-to-list 'auto-mode-alist '("\\.py\\'" . python-mode))
(add-to-list 'interpreter-mode-alist '("python" . python-mode))
(setq load-path (cons "/homes/metogra/bjohnson/python-mode-1.0/" load-path))
making sure in the last line to replace /homes/metogra/bjohnson with the directory you unzipped the files into. Then save the file (by using the mouse to click File -> Save, or by typing Ctrl-x Ctrl-s) and close emacs.
If everything went smoothly, open up a Python script you have written and click Options -> Syntax Highlighting (Global Front Lock Mode) to highlight the syntax.
If you're new to Linux, it might seem strange to create a file beginning with a dot. In reality, there are many hidden files that begin with a dot, they just aren't shown in a directory when you type the plain ol' ls command. You can see all of the files in your home directory, including hidden ones, by typing: ls -A.
Appendix C: Working with NetCDF files
NetCDF is a very neat file format developed by the University Corporation for Atmospheric Research where data is stored in a file with a header that describes the information contained followed by a set of arrays of the actual data. NetCDF files are ubiquitous in climate research.
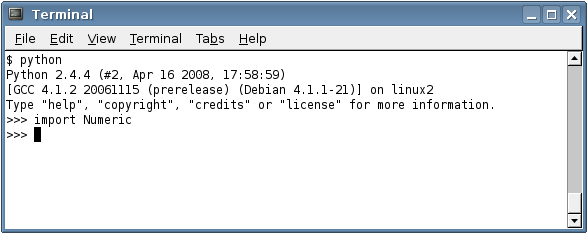
Python can interface with NetCDF files using a set of modules in the NumPy package. To see if you already have NumPy installed, open up a terminal window and type python to open up a Python interface. Next, type import Numeric (make sure to capitalize Numeric).
If NumPy is installed, you will get the following result.
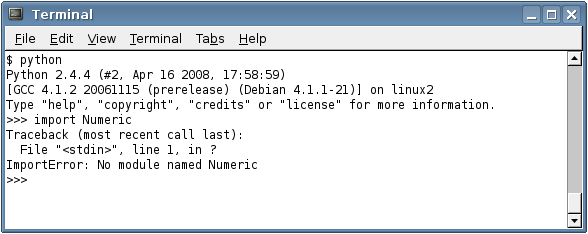
If NumPy is not installed, you will get the result shown below.
Installing NumPy
Visit the NumPy site and click "Download NumPy" in the left navigation bar. It will redirect you to a SourceForge download site, where you should download the latest release of the NumPy package. There will be different version to choose from, but download the file ending with ".tar.gz".
Using the same process we used in Appendix B, move the file to the directory you want it installed in using the mv command, unzip the file using the tar -zxvf command and delete the archive using the rm command.
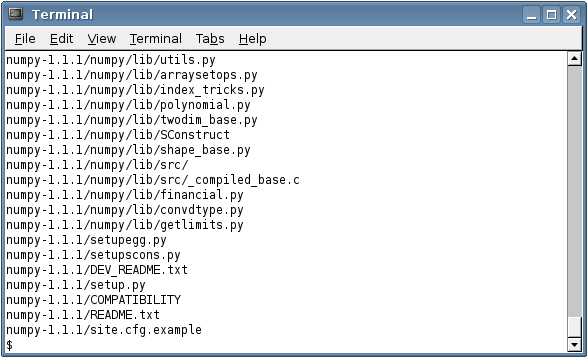
This archive is much larger than the python-mode.el archive, so it will output a lot more lines while unzipping. Below are the last few lines when I unzipped it. Notice how much the scroll bar has shrunk on the right.
Once the files are unzipped, type sudo python setup_all.py install into the terminal. You will need superuser priviledges to do this. If you do not have them, contact your system administrator for help.
Interfacing with NetCDF
Now that you have NumPy installed, you can interface with NetCDF files. A NOAA site has all of the necessary documentation for doing this.
About
My name is Ben Johnson. I am an oceanographic researcher working on the NASA Aquarius mission with Dr. James Carton and Dr. Frank Bryan.